Guide for Teachers in the VRoma Learning Environment
There is a new class of administrators in the VRoma Learning Environment, the Teacher class. Any person who is teaching classics-related content, at whatever level, may apply for a Teacher character by writing directly to the wizard Reficere; VRomans who already have a lower-status character may apply for an upgrade. This guide is written for this new class of administrators and assumes familiarity with both the Quick Start Guide and the Guide to Building and Creating Objects in VRoma, particularly the explanation of how to select the language in which VRoma speaks to you. Information that appears in either of those guides will not be repeated here.
Build Yourself a VRoma Office
The first thing new teachers should do is to create their own space in the Officina district of VRoma in the form of a personal office. Consult “Building and Editing Rooms” in the Builder's Guide for instructions on how to create and decorate your office. The one exception to these instructions involves the connection for your office; do not choose the Portae Somni but rather select the appropriate Officina corridor based on the first letter of your real last name (not your VRoma character name).
Create VRoma Characters for your Students
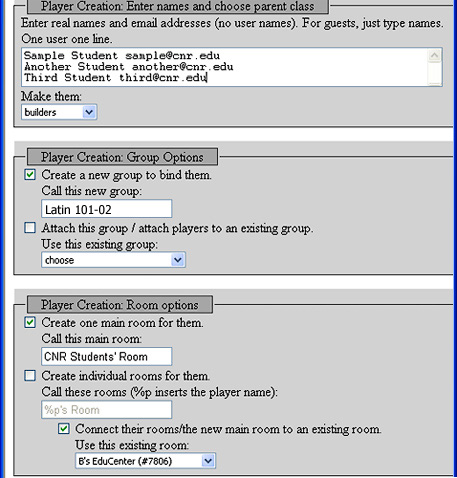
The most important new power of the teacher class is the ability to create new VRoma logins for your students and to put them in groups that will make it much easier to manage administration and communication. To begin this process, click Admin in the menu frame, which will open an Xpress Administration editing window. Select the new players tab, and type a list consisting of the students' full names followed by their email addresses, one person per line (see screenshot at right). Select one option in the drop-down list labeled Make them. Do not select guests (not enough capabilities). Your two viable choices are the following:
- mail-receiving players: These are fully fledged players with the capacity to send and receive MOOmail and internet email and to participate in threaded discussion forums. They can make full use of all VRoma objects but cannot create objects; their activities in VRoma will be recorded on their personal HTML Chat Logs (or the logs created by scribes) and these can be submitted in fulfillment of assignments. You always have the option to upgrade mail-receiving players to builders; using such upgrades as a reward for good work (and good behavior) in VRoma can be an excellent incentive.
- builders: These players have all the capabilities of mail-receiving players plus the ability to create objects and build rooms. Their building abilities can be used for something as simple as creating a note that will hold an essay or for more imaginative assignments such as researching and building a Roman house or public monument.
After you have selected the class of player, more options will appear in the editing window. We strongly recommend that you create a group for your students by checking the checkbox and typing in a group name. This will make it very easy to subscribe them to a discussion forum, to send them emails, to make them shared owners of an object, etc. Give the group a descriptive name (such as the name of the class you are teaching); if you need to create another player later to add to this group, you can use the option Attach this group /attach players to an existing group.
At this time you also have the option to create a room especially for your student group by checking the checkbox and typing in a name for the room. This room will belong only to you if your students are mail-receiving players, but they will be shared owners of the room if they are builders. If your students are builders, you will also see an option here to create a room for each of them which each will own and have as his/her “home.” You may do this now if you wish, but it is not really recommended, since your students will probably prefer to create their own rooms in the Portae Somni district. If you do create a room for the group, be sure to check the connect checkbox and choose your office as the connecting room.
We do not recommend that you make any alterations in the defaults for Miscellaneous settings or Password Options, but be sure to check the box marked Send passwords to these new users. Finally, click the Do it! button and the new players, group, and rooms (if you have chosen this option) will be created. The next page will show a list of the new players, including their object numbers and passwords; you should use the print button at the bottom of this page so you will have a record of all the passwords in case the students lose their password emails.
Managing Players
Once you have created players, you have the ability to send them new passwords if they have forgotten theirs, to email them individually or as a group, to make some editing changes, to put them into groups, or to upgrade, merge, or delete them.
- Sending Passwords and Editing: Click Admin in the menu frame, and then select the players tab. The easiest way to see all the players you have created is to select my creations in the Restrict to drop-down list, which will be second in the list, right below all. If you are looking for an individual, the easiest way is to type all or part of the player's character name or real name in the search box; when you press Enter a list of VRomans with your search term in their real or character names will appear. If you are looking for a group, make a selection from the drop-down list under Groups. Any of these options will produce a table listing all the players meeting that criterion, including their real names and email addresses. To send a new password or change a student's email address, click edit to the right of that student's name and then click send new password. You can edit the message that will be sent with the new password (by adding something like “Don't lose this one!”) as long as you do not touch %u or %p. On the editing page you can also change the student's email address.
- Sending Emails: From the table listing your students, you may also send a MOOmail or internet email message to some or all of them. Place a check in the box preceding the name of each of the students whom you wish to contact and click the send email button. You will be taken to the Forum Mailer, where you can type in a subject and message. If you want to send your message via internal MOOmail, simply click the send button. If you want to send the message via internet email, check Use outgoing internet email before sending.
- Upgrading or Deleting Students: Use the players tab if you wish to upgrade any or all of your students to builders or to delete players once your class is over or the students have graduated. Select my creations in the drop-down list, then place a checkmark next to the players you wish to upgrade or delete and click the change their level or delete players button. For upgrading, choose generic builder (#4) from the drop-down list and click the change their level button. The next page will ask for another click to confirm your selection, and the final page will report that the changes have been successful. For deleting, the next page will ask whether you are sure you want to delete the selected players; when you click the delete players button again, those players will be irrevocably deleted. If they were builders, all the objects and rooms that they created will be deleted as well, so use this option carefully. In the case of builders, it would be advisable to check with the students before deleting their characters, since they may wish to continue as VRomans even though they may be graduating.
- Setting Homes for Players: The players tab also offers a quick and easy way to set homes for your students (a player's “home” is the room he/she enters upon connecting to VRoma). Select my creations and then place a check next to all the students for whom you wish to select the same “home.” When you click the set their home button, the next page will show the students you have chosen along with a drop-down list of the rooms which can be chosen as their home. Highlight the room you want, click set their home, and you're done.
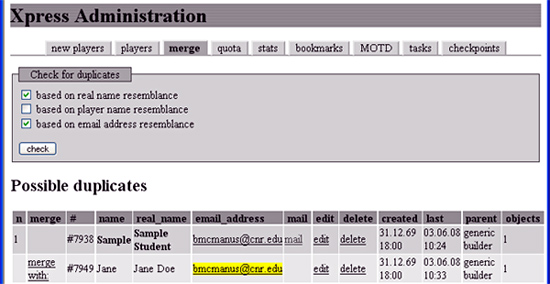
- Merging Players: The merge tab in the Admin module allows you to check whether you have inadvertently created more than one
character for any of your students. Click Merge, then click show possible duplicates. The next page will give you an option to check for duplicates
based on similarities in real names, player names, or email addresses; we recommend that you check only real names and email addresses. When you click the
check button, the next page will show all possible duplicates based on the options you have chosen, listed in a table that includes information on
when the player was created, when he/she last connected, the class of player (“parent”), and the number of objects that player owns if he/she is a builder,
as illustrated in the following screenshot.
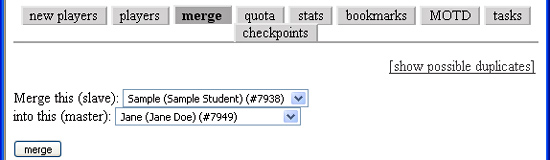
 Duplicates will be listed in pairs, and the second player in each pair will have a link labeled merge with. If you determine that a pair does
constitute a duplicate and should be merged, decide which of the players should survive (i.e., be the “master”) and which should be deleted
(i.e., be the “slave” and have all his/her belongs transferred to the master). You should make this decision based on factors such as class (if one player is a
mail-receiving player and the other a builder, choose the builder), number of objects owned (choose the player with the most objects), or last connection (choose the player who has connected
most recently). Before clicking merge with, you may want to email the person to inform him/her of what you are doing. The first player in the pair
will have a mail link which will take you to the Forum Mailer with a preformatted email showing the duplicate character; add your own message below
this, check Use outgoing internet email, and click send. Then click merge with in the Admin module;
the next page will show the first player in the pair as the “slave” and the second as the master (see screenshot below), but drop-down boxes allow you to reverse
the order if you have determined that this would be appropriate based on the factors described above. Then click the merge button. The final page
will describe all the actions taken in the merge, including the deletion of one player, the transference of the deleted “slave's” objects to the “master,”
the deletion of the “slave” from any groups or forums he/she may have belonged to, etc.
Duplicates will be listed in pairs, and the second player in each pair will have a link labeled merge with. If you determine that a pair does
constitute a duplicate and should be merged, decide which of the players should survive (i.e., be the “master”) and which should be deleted
(i.e., be the “slave” and have all his/her belongs transferred to the master). You should make this decision based on factors such as class (if one player is a
mail-receiving player and the other a builder, choose the builder), number of objects owned (choose the player with the most objects), or last connection (choose the player who has connected
most recently). Before clicking merge with, you may want to email the person to inform him/her of what you are doing. The first player in the pair
will have a mail link which will take you to the Forum Mailer with a preformatted email showing the duplicate character; add your own message below
this, check Use outgoing internet email, and click send. Then click merge with in the Admin module;
the next page will show the first player in the pair as the “slave” and the second as the master (see screenshot below), but drop-down boxes allow you to reverse
the order if you have determined that this would be appropriate based on the factors described above. Then click the merge button. The final page
will describe all the actions taken in the merge, including the deletion of one player, the transference of the deleted “slave's” objects to the “master,”
the deletion of the “slave” from any groups or forums he/she may have belonged to, etc.
Special Educational Rooms
These will be found in your list of possible objects when you select the create tab in the Inventory Manager.
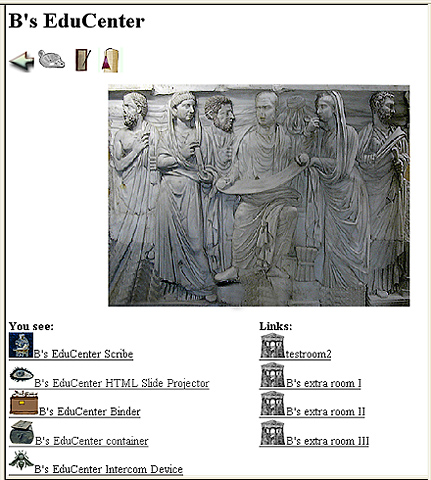
- EduCenter: This is an extremely quick and useful way to create a series of interconnected rooms containing a variety of educational tools. The final product will include a main room with its own scribe, slide projector, binder, container, and intercom device and up to ten satellite rooms, each with its own scribe and intercom device (see screenshot at right for a sample EduCenter). You will be asked whether you want to share this with another player or group (in this case, it is best to select “none,” because you don't want your students to be able to manipulate or change the objects here). Type in a name for your main room and choose the number of interconnected rooms you will need; each satellite will be given the name you type in the second box followed by a Roman numeral. Finally, choose your office as the connection room for your EduCenter. After the EduCenter has been created, if you wish to change the names of the satellite rooms, you may do so in the editing window for each room (for example, your main room might be called Campania, and your satellite rooms Pompeii, Herculaneum, and Neapolis—the names don't have to sound like classrooms). See the Builder's Guide for instructions on how to customize these rooms and also for information about the slide projector and binder; the scribe and intercom are discussed below. When editing the Movability of each of these educational tools, you might want to set Display take-icon to non-owners to “no” so that it will not be easy for students to pick these up. You should set their Home Site to be their current room but set the Level of the scribes and intercoms at 3, so you can move them to other rooms if necessary for a given project. The object called “Main” (green room icon) is an abstract object that holds together all the rooms and objects that comprise the EduCenter; your character should carry this out of sight (“in your pockets”). If you ever want to delete your whole EduCenter, start by checking this object in your inventory.
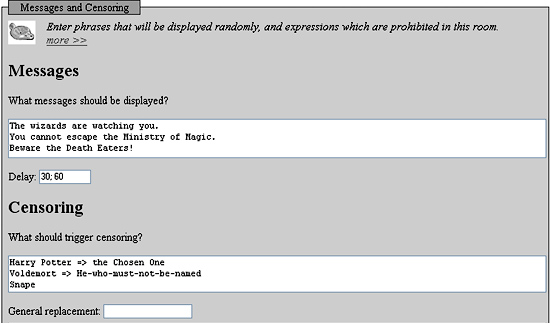
- Message Room: This is a very specialized room that you might wish to use for roleplaying. The room is like any other except for two unique features: it will periodically print out mysterious messages in the chat frame (in red italic text), and it will censor certain words or phrases, changing them to a more “acceptable” form. Edit this room like any other. To add the messages, click on the Messages and Censoring tab (see screenshot below). Type a series of short messages, ending each by pressing Enter so the next will begin on a new line. These may be anything appropriate to the theme of the room, including Latin quotations or sayings. The box labeled Delay sets the minimum and maximum number of seconds between the printing out of randomly selected messages in the chat frame; you may change the numbers in this box but be sure to leave the semi-colon between the two numbers. If you wish to prevent one word or phrase from being spoken here, type that word or phrase in the box after What should trigger censoring and then type the word or phrase that should replace it in the Replacement box; if you leave the replacement box blank, the censored word or phrase will be replaced with asterisks. To censor several different utterances, type them all in the censor triggers box, one per line. You can also submit different replacements for each censor trigger. First type the censored word or phrase, then => and finally the replacement, pressing Enter to move to the next line. Repeat this process for each utterance you want to censor (see screenshot below for an example). Whenever a visitor to this sample message room tries to say a forbidden word, the replacement will appear in the chat frame. For example, if Probator types, What do you think Voldemort is up to now? the chat frame would show Probator asks, “What do you think He-who-must-not-be-named is up to now?” Similarly, any use of “Harry Potter” would be replaced by “the Chosen One”, while every occurrence of “Snape” would produce “*****” in the chat frame. Since you are the room's owner, your web frame will include two buttons, start messages and start censoring, but nobody else will see these. Thus you can start and stop either the messages or the censoring at any time.
Special Educational Objects
- Scribe: This faithful slave will record on a log all public conversation (no SMS) in the room where he is placed. You should keep a number of these
useful slaves so you can deploy them in various locations where students have to carry out assignments, since their logs will provide an objective record of the actual
conversation (including emotes and move messages) in a given location. See Oxford Latin Course in VRoma for an example
of the type of assignment where a faithful scribe is invaluable. When editing your scribes' Movability, set Display take-icon to non-owners
to “no,” Home Site to “me,” and Level to “3.” With these settings, you will be able to
move the scribe to other locations and leave him there temporarily to record assignments, and then easily move him back using the site feature of
the Inventory Manager. Once the scribe is located in the appropriate room, click the start scribe button; when the assignment is completed, go back to the
room and click the stop scribe button (only an owner or co-owner of the scribe will see these buttons). After the scribe is stopped, the log (which you
will own if you started the scribe) will be kept in the scribe and may be accessed by clicking on the scribe and then the log. If you use the Movability editing option to set the log's home site level to 1, others will be able to read the log and email its contents to themselves,
but will not be able to remove the log from the scribe (as owner, you can of course recycle it or change its home site level and remove it yourself).
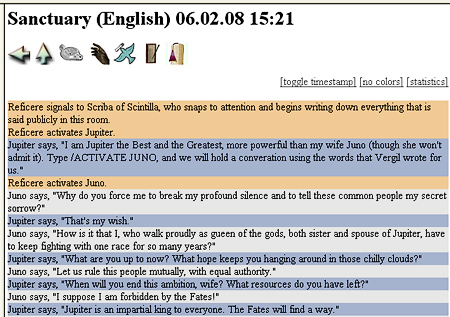
The log will be named for the room where it was recorded and the date. When the log is read in the web frame, you may click toggle time stamp to see
a listing of the time of each utterance and activity. Clicking get colors will make it easier to read by color-coding each participant's utterances or actions
(see screenshot below for an example), while statistics will provide various details about this log in a small window. These features will be lost if
you email yourself a copy of the log, since you will receive a plain-text version of the contents with a series of numbers (the unformatted time-stamp) preceding each utterance.
If your browser allows you to save frames, you may right-click on the log in the web frame (or control-click if using a MAC), select This frame, and then
Save as. This will save a copy of the log on your computer as a web page, including the ability to get colors (you must use your browser to open the
file).
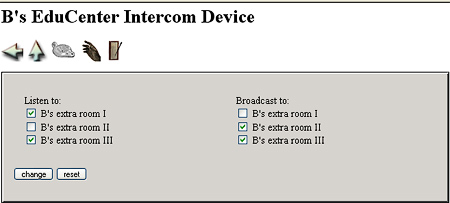
- Intercom Device: This device provides a way to listen to conversations in another room or a series of rooms and also to broadcast to that room or rooms
(however, unlike “bugging,” this monitoring will not be secret). The intercom in your Educenter is automatically connected to intercoms in all your satellite rooms. Click on
the intercom in your main room and you will see a screen like that pictured below; this is the control mechanism for all the connected intercoms. Use a checkmark to indicate the
rooms where you want to listen and/or broadcast; any combination is possible. In this example, Barbara is listening to room I, broadcasting to room II, and listening and broadcasting to room III.
Once the change button is clicked, the intercom in room I will be set to broadcast, that in room II to listen, and that in room III to listen and broadcast.
In all four rooms the intercom icon will turn red to indicate that it is switched on, so players in the various rooms will know that their conversations are being monitored. The intercom does not
record these conversations, but the HTML Chat Log will do so, or the Scribe in the main room if started. To turn off all the intercoms, click the reset button
on the intercom in the main room. All the editing options for the intercom are the same as those for other objects (see Builder's Guide) except for Connections.
This allows you to connect additional intercoms in other rooms to the one you are currently editing, so long as you own all the intercoms.
- Group: Groups are extremely versatile objects. You have already created one group, containing all the characters you have made for the students in a particular class, which you can use year after year by simply adding and deleting members. We recommend that you now create a master group (perhaps named after your school) into which you can put several sub-groups, each consisting of the students in a particular class. This will make it easier to contact students and manage forums (see below). Once created, this object will appear “in your pockets,” and it is best to leave it there; you can easily access its edit icon from the Inventory Manager. After you have created a group, use its edit icon to add a brief description. Use the Bookmarks tab to set special bookmarks for this group; you will see a drop-down list of notes and rooms you own and should select one of these at a time and click save changes to add this note or room to the group's bookmarks. The Group Members tab will allow you to add or delete members from this group. For your master group, select the sub-groups you have created, adding them one at a time. Then add or delete individuals from the sub-groups. This will make it very easy to keep the master group up to date. To delete individuals or sub-groups from a group, uncheck the members and then click save changes. You can also create groups that will be used on a rotating basis and not be connected to the master group. Such variable groups can be used for roleplaying games (e.g., Roman Men and Roman Women for an exercise on gender differences; or Senators, Equestrians, Commons, Freedpeople, and Slaves for an exercise on class differences). The groups will be permanent, but they can be populated and depopulated with students as needed using the Admin players tab or this Group Members tab.
- Forum Category: This is an abstract “holder” for various discussion forums; before creating any discussion lists, set up a forum category for
them (it would be appropriate to give this category the same name as you gave your master group). Once created, this object will apear “in your pockets,” and it is best to leave it there; you can easily
access its edit icon from the Inventory Manager, or click on Mail/Forum in the menu frame and select the subscribe tab,
where you will see an edit link. In the editing window, you may change the name and add a brief description (e.g., “A forum for all CNR discussion lists”).
Use the Access tab only if you want to enable any other players to change this object's name and description (i.e., to make them shared owners). The most
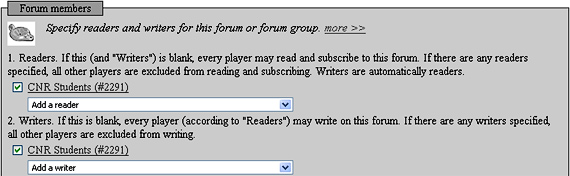
significant editing option for this object is Forum Members; this option must be set unless you want all discussion lists in this category to be
public, meaning that any VRoman may subscribe, read, and post messages. Select your master group from the add readers drop-down list
(all the groups that you own will appear at the bottom of this list) and then repeat this process for add writers (see screenshot below for an example).
Thus you and all your students will be able to subscribe and post to any discussion lists within this forum category, and any other players will not be able to do so.
Of course, each player must actually subscribe to the discussion list individually (see instructions below).
- Forum: This is an individual threaded discussion list, which may be used for a particular class or topic. Once created, this object will appear “in your pockets,” and it is best to leave it there; you can easily access its edit icon from the Inventory Manager, or click on
Mail/Forum in the menu frame and select the subscribe tab, where you will see an edit link (see screenshot below).
- Editing a Forum: In the editing window, you may change the name and add a brief description, which will appear in the subscribe table
(see screenshot below). Other editing options resemble those for Forum Category, except for Forum Affiliation, where you should connect the individual
discussion lists to the Forum Category that you created for your students by selecting that from the drop-down list. Once you have done this, you and all your students
will be able to subscribe and post to this discussion list. If you want to restrict the readers and writers further, perhaps only to the students in a particular class,
use the Forum Members tab, and select the sub-group that you created for that class as readers and writers.
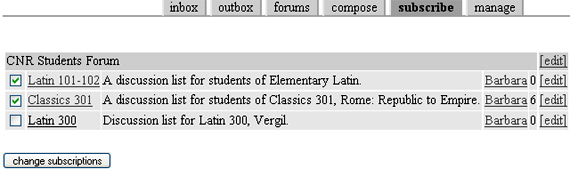
- Subscribing to a Forum: When you set forum members, you have only determined who is allowed to subscribe to a discussion list. Each eligible player must subscribe individually. Click on Mail/Forum in the menu frame and select the subscribe tab, where you will see a list of the forums to which you are allowed to subscribe (see above screenshot). Check the box next to the ones you want to join and click change subscriptions. To unsubscribe, return to this page, uncheck the appropriate box, and click change subscriptions.
- Participating in a Forum: To read messages and post to a discussion list, click on Mail/Forum
in the menu frame and select the forums tab; then select the specific discussion list. You will see a window similar to the
screenshot below, but with fewer options. Clicking on an individual message will open that message underneath the table and will change its icon to “read” (i.e., remove the green arrow);
if you posted the message, you may use the edit button to modify the message, which will appear with a notation of when it was modified. Others may
use the reply button to post a response. If you click display whole thread in new window beneath the message, a new window
will open with the original posting and all the replies, so you can read the entire thread at once and also post a reply to any message. Above the message table you will see
a number of phrases in brackets: click new post to post a message on a new subject, catch up to mark all messages as read
(though you will not actually have read them!), and mark as unread to restore the unread icon to all messages. The final option will toggle between
threaded view and flat view; this determines whether the message table will list all messages in a straight column or will
indent the replies within each thread. In threaded view, clicking the plus sign (+) next to a thread shows all indented replies, and clicking the minus sign (-) hides all replies.

- Administering a Forum: To manage a discussion list, click on Mail/Forum in the menu frame and select the forums tab; then select the specific discussion list. If the first option in brackets says normal, click it and it will change to admin. Now you will see a window like the screenshot above. To delete an entire thread, put a checkmark in the box next to the original message and then click the delete button. Or click the close button if you prefer to prohibit any editing or posting but want to archive the thread so it can still be read (clicking reopen will restore the ability to edit and post). From here you can also copy or move one or more threads to a different discussion list using the drop-down list and buttons provided. If you wish to delete an entire discussion list, use the Inventory Manager, but first delete the discussion list from the forum category (using the discussion list's editing window, set Forum Affiliation to not connected).
- Editing a Forum: In the editing window, you may change the name and add a brief description, which will appear in the subscribe table
(see screenshot below). Other editing options resemble those for Forum Category, except for Forum Affiliation, where you should connect the individual
discussion lists to the Forum Category that you created for your students by selecting that from the drop-down list. Once you have done this, you and all your students
will be able to subscribe and post to this discussion list. If you want to restrict the readers and writers further, perhaps only to the students in a particular class,
use the Forum Members tab, and select the sub-group that you created for that class as readers and writers.
Mail Options
Teachers have the ability to add a “signature” to all email messages they send from within the MOO. Click on Preferences in the menu frame and then select the Mail Options tab. Type or paste the information you want to include in your email signature into the box labeled Mail Signature, and your emails will have a more professional appearance.
Subscribe to the Teachers Forum
Everyone with a VRoma Teacher character belongs to the Teachers Group and is eligible to subscribe to the Teachers Forum. We strongly encourage you to subscribe to this discussion list, where you can post questions or suggestions and discuss common concerns with other teachers using the VRoma Learning Environment. Reficere will also use this forum to announce new VRoma teaching resources such as games and activities.