Guide to Building and Creating Objects in VRoma
Registered users in the VRoma Learning Environment (“VRomans”) belong to one of the following categories, distinguished by the color of the tunic worn by the icons (as in ancient Rome, color is a marker of status):
 Players can use all the features of VRoma, including mail, but cannot add to the environment
by creating objects or building. Most VRomans begin as players.
Players can use all the features of VRoma, including mail, but cannot add to the environment
by creating objects or building. Most VRomans begin as players. Builders can create objects and extend the environment by building new rooms.
 Programmers can not only create objects and build, but also give objects new features
and make them perform new actions.
Programmers can not only create objects and build, but also give objects new features
and make them perform new actions. Teachers are builders who also have administrative powers, including the ability
to make new players and upgrade them to builders.
Teachers are builders who also have administrative powers, including the ability
to make new players and upgrade them to builders. Wizards are administrators who can do anything.
This guide is for all users who are builders or above and assumes that you are already familiar with the Quick Start Guide, particularly the explanation of how to select the language in which VRoma speaks to you. Any student who wishes to be upgraded to builder status should apply to his/her teacher; players not connected to a teacher should apply to the wizard Reficere.
Creating Objects
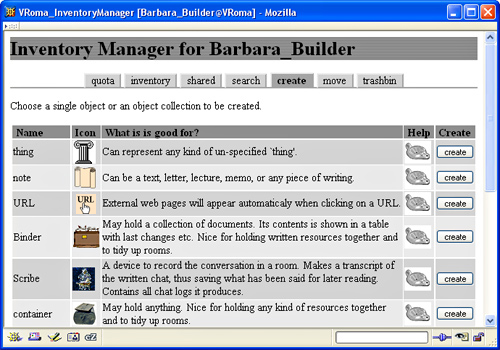
As a builder, your most important tool will be the Inventory Manager, accessed by clicking Create/Organize in the menu frame (see screen shot). When you choose the create tab, you will see a list of different types of objects, with their standard icons and brief descriptions of what they are and can do. Select the one you want and click the create button next to it. On the next page you will be asked to give your new object a name (which you can easily change later, if you wish) and also whether you want to share ownership of this object with another player. If you do, select that player's name from the drop-down list of eligible builders; you may also share ownership with a group to which you belong. Remember that shared owners can also edit an object, so choose this option only if you truly want to work on this object with another person or a group.
Once you have chosen a name for your new object, click the create button. The next page will show your new object with its object number proceeded by # (e.g., #5678). Since you are now carrying the object (it is literally “in your pocket” and cannot be seen by anyone else), you will need to put it somewhere. There are a number of ways to do this, but the easiest is to click the move button right below your object's icon. This will give you a page that lists places you can put your object, either in the room in which you are standing, or in a container in that room. Select the radio button next to the place you want to put the object, and click move. You may also type /drop NameofObject in the typing frame or view the object in the web frame and click the drop icon.
Building Rooms
Begin with the same procedure described above, but select room as the object you want to create. On the next page, give your room a name and select a shared owner if desired. However, before clicking the create button, be sure to connect your room to another room in VRoma or your new room will be floating in space with no entrances or exits. You will see a drop-down list of rooms that allow connections; if this is your first room, the list will include only office corridors (for teachers' offices) and the Portae Somni (Gates of Sleep); for subsequent rooms you will only see other rooms you own in this list. For your first room, choose the Portae Somni, since this is a twilight realm where anything is possible and your imagination and creativity can soar. After selecting Portae Somni and clicking the create button, you will automatically be transported to your new room, which will be displayed in the web frame. The very first room you create will also be designated your “home,” the room where you sleep and the place you arrive whenever you connect to VRoma. If you create other rooms later and wish to change your home, simply go to another room that you own, type @sethome in the typing frame, and press Enter.
Editing Rooms
Whenever you see the icon of a wax tablet and stylus, you can click on it to edit the associated object. When you are in a room you own, the icon will appear at the top of the web frame, or you can find it next to the room's name when you examine your inventory in the Inventory Manager. An editing window will open with twelve options. Remember that you must always click the Save Changes button to preserve every change you make.
- Name: Here you can change the name of your room.
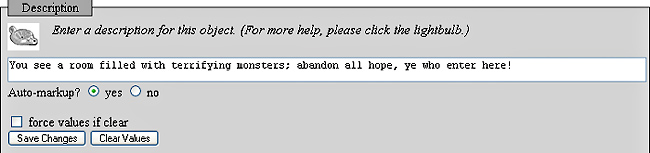
- Description: Type here a description of your room, including any kind of information that you want visitors to see. The radio button for Auto-markup?
is set to “yes” by default, and you should not change this unless you know how to write correct XHTML code. Keeping the button set to “yes” will ensure
that your description is formatted correctly in the web frame, including any paragraphs and line breaks that you have typed. If you are proficient in XHTML code and wish to add links and other features to your room, you may select the “no”
radio button and write your code directly in the description box (include only code that would go inside body tags, which are provided by the MOO). Contact
Reficere for more information on how to do this.
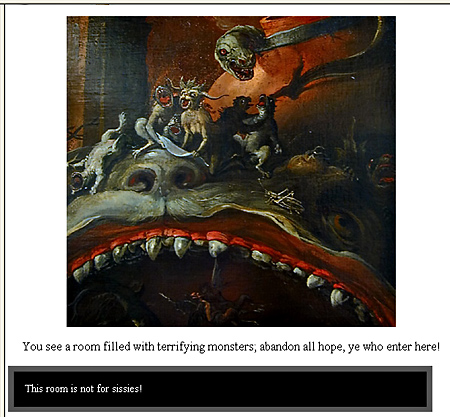
- Blackboard: Anything you write here will appear below the room's description as white text in a black box—very striking, so use sparingly (see the
room screenshot below for an example). The black box will not appear in the web frame unless you have added some text here.

- Appearance: This is the CSS (Cascading Style Sheet) code that controls various aspects of your room's appearance. If you change this, you must do it carefully,
so as not to alter the structure of the code. Simply put, you should make changes only between colons and semi-colons. For example, if you want to change the color of the text
from black to red, change only the word that names the color (e.g., color: red;). If you want to make the text larger, change only the percentage (e.g., font-size: 120%;), or
change “left” to text-align: center; if you want to center your text. If you find that you have messed up the code and want to return to the default
values, click the Restore Inherited Values button; this will always return any property to the value it has inherited from its generic parent.
- Access: This enables you to lock your room, so that only you and others you designate will be able to enter it. This feature should be used very sparingly, and only when the room is not a passageway between two other rooms (in other words, the room is a “side room,” connected only to one other room). To lock a room, click the Access tab and select the “yes” radio button. If you Save Changes now, the owner (you) will be the only player who can enter your room. Unless you are a hermit, you will probably want to admit others, and you grant this permission via the Readers drop-down list (in this context, “readers” means anyone who can enter your room and view it in the web frame). You may add individual players or groups one at a time, saving the changes after each addition. If you later have a falling-out with a player and want to exclude him, uncheck his name in the readers list and Save Changes. You may also add or remove Writers in the same way; in this context “writers” means shared owners who can not only enter your room but also change it through the editing options, so don't grant this permission unless you are willing to allow another player to redecorate your room. Checking the final option here, Apply all of these settings explicitly to all of this object's contents, enables you to apply the locking, readers, and writers settings to all the objects in your room with one click, should you want to do this.
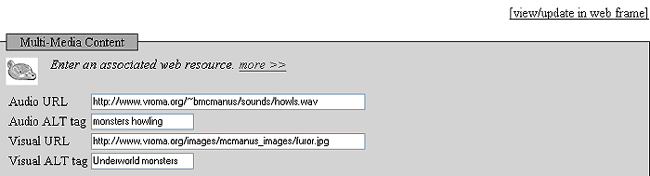
- Multi-Media Content: Here you can add sound, an image, or a video clip to your room. If you have a sound file that is already online, you may play it
whenever anyone enters the room by typing the full URL (beginning with http://) into the box labeled Audio URL; also type a very brief description
into the box labeled Audio ALT tag. Just leave this box blank if you do not wish to add a sound file. To add an image, type the full URL of an online image
into the box labeled Visual URL and type a very brief description into the box labeled Visual ALT tag. The image will appear
in the web frame centered above the description text (see above screenshot of room). If you wish to add a short video clip or Quicktime VR file instead of an image, type the
full URL of that file here. The sound or video file will play on the computer of a visitor to the room when he/she enters the room or clicks view room in web frame
(assuming that person has the appropriate software on his/her computer to play the sound or video file). To see the effects of the changes you have made at
any time, click view/update in web frame.
- Order: This enables you to change the order in which objects and exits are listed in your room (these will always be found at the bottom of the web frame; you may have to scroll down to see them). If there are two or more objects and/or exits in your room, you will see them listed in boxes. Select the one you want to move and click the raise or lower button; repeat this procedure until everything appears in your preferred order, and then click Save Changes.
- Clean Up: This is useful if other players have littered your room with their objects. Here you will see a list of objects that can be moved from your room. Check the boxes next to the ones you want out of your room and click the Move button (it's definitely easier than cleaning up your real-life room!). The objects will be sent back to their owners (“in their pockets”).
- Talking: Here you can change the way dialogue is printed out in the chat frame. The first choice, Use receipt, determines whether a speaker sees You say while everyone else sees NameofPlayer says; the default is “no,” meaning that everyone will see NameofPlayer says. The second choice, Verba dicendi, determines what verbs will introduce the dialogue. The default, Use the verbs specified in the language package, means that each player will see the verbs appropriate to the language that he/she has selected (e.g., says/asks, dicit/rogat, sagt/fragt, etc.). If you select the last option, Use the verbs specified below, you will need to change all the verbs in the second column by typing in replacements (such as whisper, shout, croak, or whatever verbs seem appropriate to you), but make sure that you type in the correct second- and third-person forms.
- Exits: Here you can delete entrances and exits to your room or add new ones by selecting from a list of rooms that allow connections. Just make sure that you retain at least one entrance/exit to another room.
Editing Objects
To edit any object, simply click on its edit icon in the Inventory Manager or in the web frame. An editing window will open with whatever options pertain to that type of object; many of these are the same as the editing options for rooms, so this section will only explain options that are different from those used in editing rooms. Always click the Save Changes button to preserve every change you make.
- All Objects:
- Icon: Each type of object has a distinguishing icon which signals to other players what kind of object it is, which is a useful function. However, you may change the icon if you have a suitable online image (file ending in .jpg or .gif); this image must not be too large, since the icon will be displayed at approximately 32 pixels square. In the box marked Icon type the full URL (beginning with http://) into the box. Once you click Save Changes you will immediately see the new icon; if you don't like it, clicking Restore Inherited Values will restore the original icon.
- Access: This enables you to lock an object so that it is not viewable in the web frame except by you and others you designate as “readers.” In most cases you will want everyone to view and enjoy your object, but if your object requires secrecy, click the Access tab and select the “yes” radio button. If you Save Changes now, the owner (you) will be the only player who can view your object in the web frame; others will see an icon of a locked Roman padlock next to name of your object, with no clickable link. If you want selected others to view your object, you must grant this permission via the Readers drop-down list (in this context, “readers” means anyone who can view your object's image and description in the web frame, read its text if a note, use the take icon to pick it up, etc.). You may add individual players or groups one at a time, saving the changes after each addition. If you later want to exclude a reader, uncheck his name in the readers list and Save Changes. You may also add or remove Writers in the same way; in this context “writers” means shared owners who can not only view your object but also change it through the editing options.
- Movability: This determines how others can use your objects. The first option is Takeability. Generally, you should leave this option at the default, which is “Display take-icon to non-owners.” The second option, Movability, allows you to set a Home site for your object, a place where it belongs and will be returned if carried off; you should set a home site for every object you own. The home site can be yourself (“your pockets”) or any room or container you own. Make sure you are standing in the room or in the presence of the container that you want to make your object's home site, and then type the name of the container, the room (or simply here), or your character name (or simply me) into the home site box. Finally, choose the Level of takeability by selecting the appropriate radio button: 0 sets no level; 1 means that no one (not even you, unless you change this option) will be able to pick up the object and the take icon will not appear; 2 is often the best choice, because others can use your object but Vigil, the night watchman, will return it to its home site periodically so it never becomes permanently lost; 3 is the option to choose if you anticipate that you or others will need to use the object in another location for any period of time (for example, you may have a scribe that you want to record converations in another place sometimes but you will go and fetch him back to his home site when you need him). Don't forget to click Save Changes to preserve your choices.
- Binder: This is a useful object for holding and tidily displaying a number of documents (“notes”). When a player clicks on the
binder, all its contents will be listed in the web frame with descriptions and information about when the player has last viewed each document.
- Binder level: Here you may set the way others can use the binder. If you select Level 1, anyone can add documents to the binder or remove them; if you select Level 2, only you and any co-owners can add or remove documents, though others can view the binder's contents and read the documents.
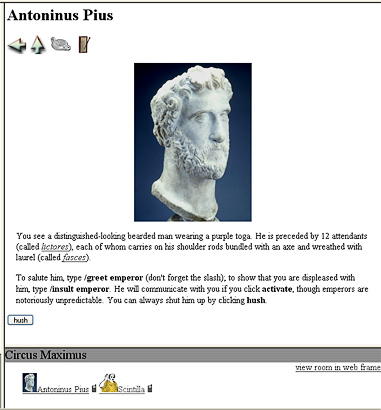
- Bot: Bots are objects with preprogrammed dialogue who will carry on conversations with visitors. There are two types of bots you can create.
Player Bots are the most fun, since they seem to be players themselves; once activated, their icons appear in the player frame and the Who browser with the
little cellphone icon, and they can communicate via SMS as well as through the chat frame. The screenshot below shows Antoninus Pius, a player bot located in the Circus
Maximus who has been activated. Note how his icon appears in the player frame next to a real player, Scintilla. Nonplayer Bots do not pretend to be other players;
they are less spontaneous and do not appear in the player frame or Who browser. They should be used for inanimate objects like talking statues or when you want to have more
control over the bot's dialogue (for example in a bot that will be used as a “tour guide” or for a classroom assignment). Bots have three special editing options
that literally “put words in their mouths.” When your bot responds to a statement, he/she will first look for patterns, then keywords, then for a question mark
at the end of the statement; if there are no matches in the statement, he/she will say one of his/her random responses.
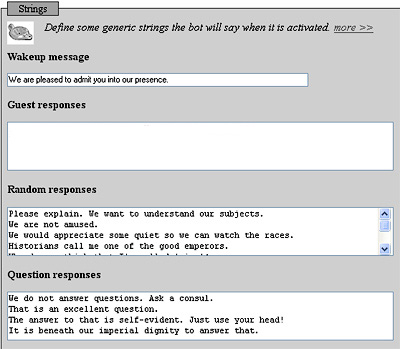
- Strings: These are the comments your bot will make when he/she has nothing better to say. Your bot will come with a number of inherited statements
which are pretty general in nature. Keep any of these that you want, but definitely add to them; imagine what kind of person you want your bot to be and then write
statements that project his/her personality. Begin each statement with a capital letter and end with appropriate closing punctuation; when you have finished a statement
press Enter so the next statement will begin on a new line in the editing box. Each box here has a different purpose (see screenshot below for examples):
- Wakeup message: Only one statement can be entered here. This will be spoken by Nonplayer Bots when they are activated, but Player Bots do not say wakeup messages, so you can leave the default here or make it blank.
- Guest responses: This can be left at the default or blank, because these bots do not respond to guests in any special way.
- Random responses: These are very important, because the bot will choose one of these whenever there is no pattern, keyword, or question response for him/her to say. You may type as many statements as you like here (ending each individual statement by pressing Enter), the more you write here, the richer your bot's personality will seem.
- Question responses: Your bot will choose one of these when he/she encounters a question mark at the end of something a player says, unless a pattern or keyword has been used.
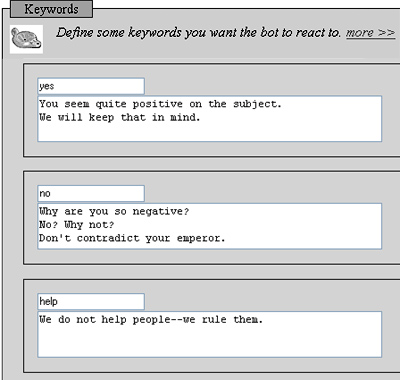
- Keywords: If one of these keywords appears in a statement, your bot will choose a response written especially for that word (unless he/she first finds
a match with a pattern). Your bot will inherit some general keywords, but you may remove some or all of these words by deleting the keyword in the header box and all the statements
in the responses box, or you may edit and add to the responses already there. You should add more keywords that are appropriate to your bot's situation and interests; end each response
by pressing Enter so the next response to that keyword will begin on a new line (see screenshot below for examples).
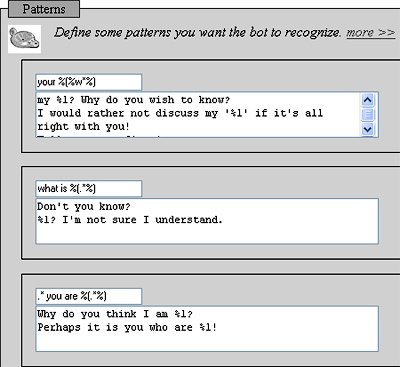
- Patterns: Your bot will inherit some patterns; since these use special symbols (see screenshot below), you should not try to edit these unless you understand how these symbols work. However, if you don't like any or all of these you can easily remove them by deleting the contents of the header and response boxes (don't forget to Save Changes). If you later decide that you want them back, simply click Restore Inherited Values and they will all reappear. NB: Nonplayer Bots do not respond to patterns (so their pattern boxes will be blank); this is one of the reasons they seem less spontaneous than Player Bots. However, the absence of patterns gives you more control over what the bot will say in a given situation.
- Strings: These are the comments your bot will make when he/she has nothing better to say. Your bot will come with a number of inherited statements
which are pretty general in nature. Keep any of these that you want, but definitely add to them; imagine what kind of person you want your bot to be and then write
statements that project his/her personality. Begin each statement with a capital letter and end with appropriate closing punctuation; when you have finished a statement
press Enter so the next statement will begin on a new line in the editing box. Each box here has a different purpose (see screenshot below for examples):
- HTML Slide Projector: This useful object provides a way to organize information (including text, images, web sites, and even sounds) to
present to others in an interesting way, analogous to an in-MOO slide show or PowerPoint presentation. The projector can contain up to 30 slides; the screenshot below
demonstrates what you, as the projector's owner, will see when you click on your projector; a non-owner will see only the first three slides, since the fourth is hidden, and
only one icon, the zoom image (
 ).
).
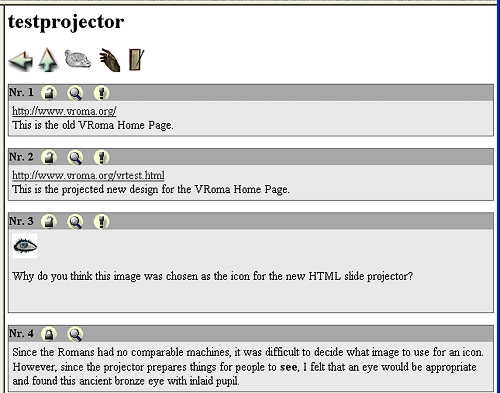
- Slides: To create a slide, select the first number in the list and type your information in the editing box. If you type the URL of a web page
on the first line, that web page will appear in the web frame when the slide is loaded. Press Enter after the URL and type a description of the web page on the next line
if you wish this to appear in the slide summary list (as pictured above). However, if you type the URL of an image file (ending in .jpg, .gif, or .png) in the first line, only that image will
appear in the slide summary list and in the slide itself when projected. In order to include both text and an image in the same slide (as in slide 3 here), you will need to use
correct XHTML code in the slide editing box. If you wish to type only text in the editing box (as in slide 4), no XHTML code is required. After you have composed the slide, click the appropriate
radio button to determine whether the slide will be hidden or not (a hidden slide can only be viewed by the projector's owner or co-owners). This is useful, for example, if you
ask a question and place the answer on the following slide (as in slide 4). Finally, if you want a sound to play when a slide is viewed or projected, type the full URL of
a sound file (beginning with http://) into the box labeled Background sound. Click Save Changes as you
complete each individual slide, because if you select the next slide number before doing so, you will lose all your editing for that slide. When you use the projector
to show slides to others, you can hide or unhide individual slides by clicking on the first icon, and you can project the content of the slide onto the web frame of
every player in the room by clicking the project icon, an exclamation mark (
 ).
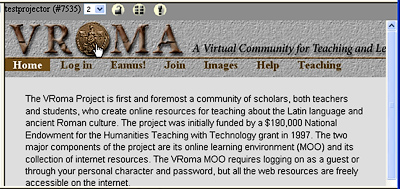
Once you begin showing the slides, a navigation bar will appear at the top of the screen so that you can control the slides using the numbers in the drop-down box and the icons
(see screenshot below).
).
Once you begin showing the slides, a navigation bar will appear at the top of the screen so that you can control the slides using the numbers in the drop-down box and the icons
(see screenshot below).
- Slides: To create a slide, select the first number in the list and type your information in the editing box. If you type the URL of a web page
on the first line, that web page will appear in the web frame when the slide is loaded. Press Enter after the URL and type a description of the web page on the next line
if you wish this to appear in the slide summary list (as pictured above). However, if you type the URL of an image file (ending in .jpg, .gif, or .png) in the first line, only that image will
appear in the slide summary list and in the slide itself when projected. In order to include both text and an image in the same slide (as in slide 3 here), you will need to use
correct XHTML code in the slide editing box. If you wish to type only text in the editing box (as in slide 4), no XHTML code is required. After you have composed the slide, click the appropriate
radio button to determine whether the slide will be hidden or not (a hidden slide can only be viewed by the projector's owner or co-owners). This is useful, for example, if you
ask a question and place the answer on the following slide (as in slide 4). Finally, if you want a sound to play when a slide is viewed or projected, type the full URL of
a sound file (beginning with http://) into the box labeled Background sound. Click Save Changes as you
complete each individual slide, because if you select the next slide number before doing so, you will lose all your editing for that slide. When you use the projector
to show slides to others, you can hide or unhide individual slides by clicking on the first icon, and you can project the content of the slide onto the web frame of
every player in the room by clicking the project icon, an exclamation mark (
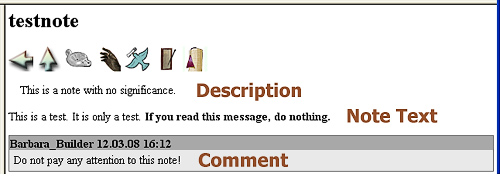
- Note: This can be any kind of text-based document, from a quick memo to a full-fledged literary text (for example, in VRoma we have a number
of “notes” that are actually rather lengthy Latin poems with full hyperlinked vocabulary and commentary). You may use the tab Description
to write a brief introduction to the note text; if the note is stored in a binder, this description will appear next to the name of the note in the table showing the contents of the binder.
When a note is viewed in the web frame, its description will appear at the top under the icons, then the note text proper, and finally any comments added by the owner
(see screenshot below for an example).
- Note Text: Place the actual contents of the note in this editing box. You may type directly in the box or copy and paste from another program. If you leave the radio button for Auto-markup? set at the default (“yes”), overall format, spacing, and line breaks will be preserved though not decorative elements like bold or italic text. If you select the “no” radio button, you can format your text any way you choose by writing correct XHTML code directly in the note text box (include only code that would go inside body tags, which are provided by the MOO, and use the tab Appearance for the CSS that controls presentational elements).
- Backup: The MOO automatically makes two levels of backups of your note text, so if you have made changes and don't like them, you can come here, copy your previous version, and paste it in the note text editing box.
- Expiry Date: Since many notes are meant to be ephemeral, if you know that your note will be useless after a certain date, use this tab to set a date and time for the note to be automatically recycled.
- Comment: Use this tab to enter a comment about this note that will appear in a special box under the note text proper (see screenshot below).
- HTML Document: This is a special kind of note that will appear in the web frame but look like an independent web page; for example, no icons will
appear at the top of the frame. This means that anyone who views it must click view room in web frame to see the room again, and you must use the
inventory tab in the Inventory Manager to see the edit icon so you can edit the document again. The editing options are the same as those for a note
with one exception, but they work somewhat differently. For example, the description will not appear in the web frame at all unless the document is placed in a binder, in
which case it will be next to the document's name when the binder's contents are listed. The MOO does not apply auto-markup to the note text, so you must be able to
write good XHTML code to format the note text properly.
- HTML Extra: This provides three boxes, one for any Onload code, one for Doctype which is already filled in and should not be changed, and one for Script, which is the place to enter any scripting code.
- URL: This object provides a quick and easy way to place a link to an external web page in a room. Use the Name tab
to list the title of the web page, for that will appear next to the URL icon in the web frame. When a visitor clicks on the name or icon, the external web page will be
displayed without any icons, so anyone who views it must click view room in web frame to see the room again, and you must use the
inventory tab in the Inventory Manager if you should need to change the name or the URL.
- URL Address: Type the full URL (beginning with http://) into the box labeled URL. If you want the external web page to open in the web frame, leave the default (web_frame) in the box labeled Target; otherwise type new_window there.
Quota
Quota is to a VRoma builder what capital is to a real-world builder—without enough of it you can't complete your construction. Every VRoma builder starts out with 50,000 bytes of quota, and everything you create (including logs) consumes some of your quota. However, unlike in the real world, VRoma builders have a feature called “free quota.” This means that if you get a message that you are out of quota, you have only to look at your quota by clicking the quota tab in the Inventory Manager, and your quota will be automatically increased by 10% (don't you wish that this would happen when you check your wallet in the real world!). You can also increase your quota by recycling some objects you own (see the next section), and you should certainly check your inventory periodically and see whether you no longer want or need some of the objects you own.
Recycling and Deleting Objects
You should always use the Inventory Manager to recycle objects that are no longer needed (do not use a typed text command to do this!). Click on the inventory tab and you will see an organized list of all the objects you own, with the most recent first. You can easily sort these in a different way by clicking on the categories in the list heading, by object number, type of object (Class), name (Object), or location. Place a check mark next to each object you wish to recycle and then click the recycle button. The next page will show the objects you have selected, plus any contents they might have, which you can optionally recycle at the same time by clicking the check all button. When you have checked all the items you wish to recycle, click the recycle button, and these items will be moved to the trashbin. This means that they are removed from the MOO, from your inventory, and from your quota, but you can still recover them if you change your mind (see below). Rooms, however, are an exception—rooms cannot be recycled; they must be permanently deleted, along with their exits and entrances. So if you follow this procedure for a room, you will not be able to recover it.
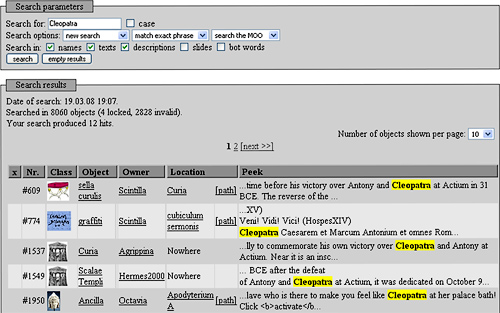
Search
This is another extremely useful feature provided by the Inventory Manager. When you click the search tab, you will be able to search your own inventory or the entire MOO for a word or phrase, searching in any combination of object names, descriptions, texts, slides, or bot words. The results appear in a sortable table similar to that which lists your own objects, and you can click on an object to view it immediately in the web frame or on a room to be transported there. The screenshot at right shows part of the results of a search for Cleopatra. Be sure to select search the MOO in the last drop-down box if you want to conduct a broad search, because the default for that search option is search inventory, meaning search only within the objects you own.
Other Uses of the Inventory Manager
- inventory: Use this tab if you have misplaced an object you own. Click on site next to that object (the word should be highlighted in yellow if the object is away from its home site). On the next page, click move back to home site and your object will be retrieved immediately. You will also see a multipletab which will list any misplaced objects and enable you to retrieve them all at once.
- shared: This works just like the inventory tab except it lists objects that other players have shared with you (in other words, objects that you co-own). You may use this tab to view or edit these objects.
- move: This tab will show you some objects you own and give you the opportunity to easily move them to the room in which you are standing, a container in that room, or to your own pockets.
- trashbin: This will show you the contents of your trashbin, namely the objects that you have recycled. It's a little like a pawnshop, since you have the ability to reclaim recycled objects by clicking the restore button. The restored objects will be moved to you (“in your pockets”) and will be computed in your quota as well. From this tab you may also permanently delete objects by clicking the delete button; once you do this they are irrevocably gone.